Steel Star Defender
- caderboden
- Mar 25
- 10 min read

Engine: Unreal Engine
Genre: Metroidvania, Sci-Fi, Modern
Project: Collaborative
Job: Programmer
Description
Steel Star Defender is a Modern Sci-Fi 2.5D Metroidvania in which the main character is a robot magical girl named Nova, who is trying to escape the government.
Damage System


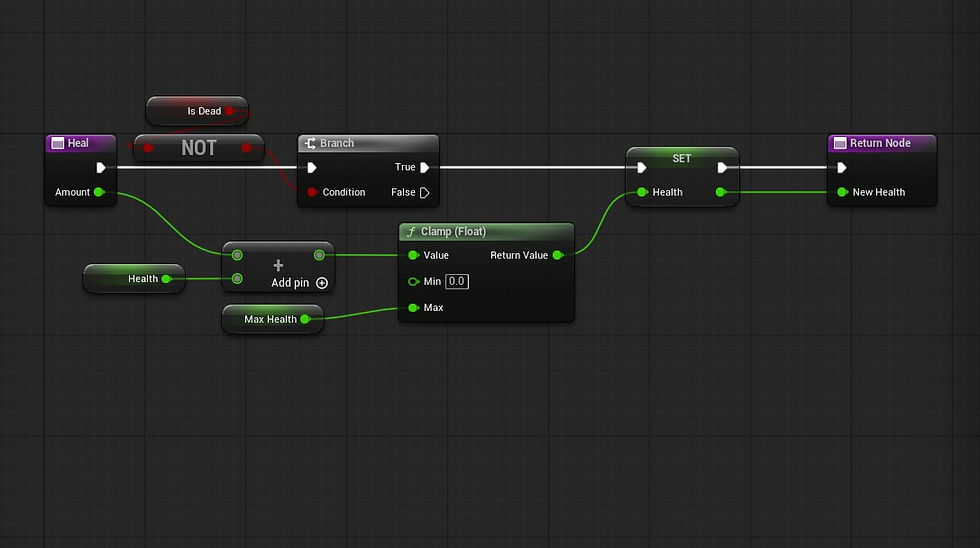


The damage system I had to create was fairly easy overall, but a few parts were complicated. The system consisted of 5 parts: a structure covering the layout of all required data, two enumerations covering damage response and damage type, a blueprint interface covering each base function, and, lastly, the actor component itself, which will be added to any character that can be damaged or killed.
The first function I created for this system was the heal function, which would be referenced in each pawn class. I would then be able to reference those functions to heal each character using their own blueprints.
The next function was the actual damage. To get this to work, I first created a macro that not only sets the requirements for dealing damage but also indicates whether the attack was blocked, unblocked, or dealt no damage. I still don't fully understand macros as I rarely see them being used or created, but it's definitely another step in a new direction. After the creation of the macro, most of the code in both healing and damage consisted of taking the current health and adding or subtracting the amount of damage taken from it.
AI Enemies
For this project, the biggest hurdle for me was creating the AI. Since the game was 2.5D, I had to find a way to keep the character on the Y-axis and only move and detect the player on that same plane. After researching, I came across "Planar Constraint" and the "AI Perception Component."

The "Planar Constraint" for planar movement was set to Y, meaning the player could not switch to X while moving and had to stay on a Y path. I also removed the nodes connected for moving in other directions to stop weird glitches from occurring when accidentally clicking the up and other axis keybinds.


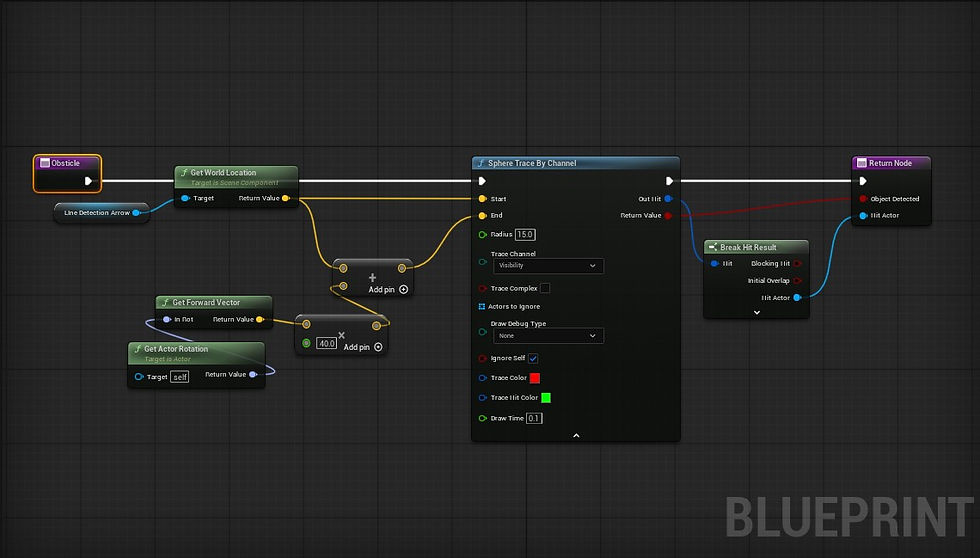

The next difficult task was how to make the AI move and know when to stop and turn around. To do this, I had to use 2 diffrent sphere tracing methods, one for tracing the ground and another for tracing objects in front of the NPC. This includes when 2 enemies collide. In the floor detection image, you will see the result of the trace detection that there is no floor at the break on the floor, so it turns around, and in the object detection and enemy interaction image, you will notice that the enemy turns around once detecting the wall or another NPC that blocks its path.
In the following trace images, you can see the two functions for each of the sphere traces and how the floor trace collision uses a negative value and upward vector to reach the floor at the lower part of the character, and how the other uses the forward vector to see an amount of direction in front of the character.


Following the object and floor detection, I moved on to detecting and taking action upon finding the player. To do this, I had to use the AI perception on the pawn, and there are many options to choose from, including AI sight, perception, touch, hearing prediction, and damage. For this specific game, I had to use AI sight, which let me set a radius in which the enemy could see the player and a range in which the enemy would lose track of the character. Once that was set, I used variables to make the character stop moving upon seeing the player and shoot in whatever direction the character was located. Once the character was out of sight, the NPC would resume patrolling.
Pickups


There are a few pickups in the game, but the primary ones are the max health increase pickup in the first image and the healing pickup in the second image.
As I needed all the pickups to have something in common, I created a master blueprint with the event to destroy itself when interacted with. This meant that all of them would do the same once they had completed their other functions.
Once complete, I made it so that these would have a random chance of dropping from defeated enemies, which turned out to be very simple.


o
Wall Jumping


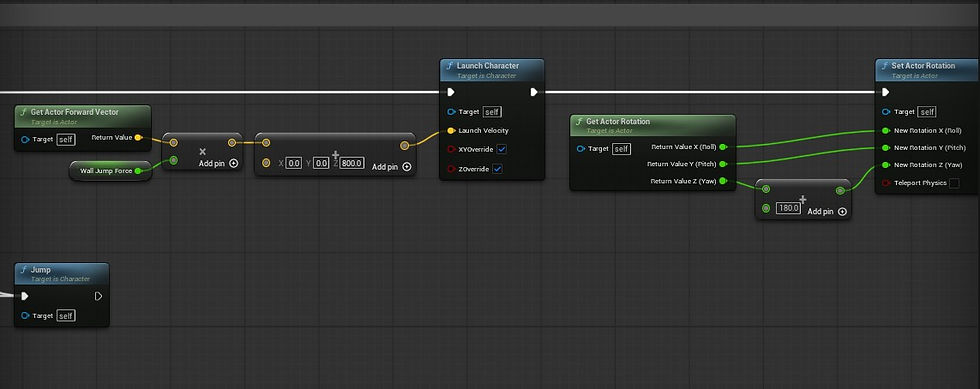
I haven't done wall jumping before, so this was a fun new mechanic to be able to recreate in this game. At first, my thought process was to use something like overlapping and line tracing, or a hold-down interaction. In the end, it was associated with event tick and trace channeling. While I got the trigger event wrong, most of my code turned out correct once I looked further into how it should work. The two additions that were necessary were the Vinterp to contrast, which decided how long the player would be falling down when you stop wall jumping. Second was adding a launch character and changing the rotation node. After these last changes, the last thing needed was animations, which I mentioned later in this article
Save/Respawn Points

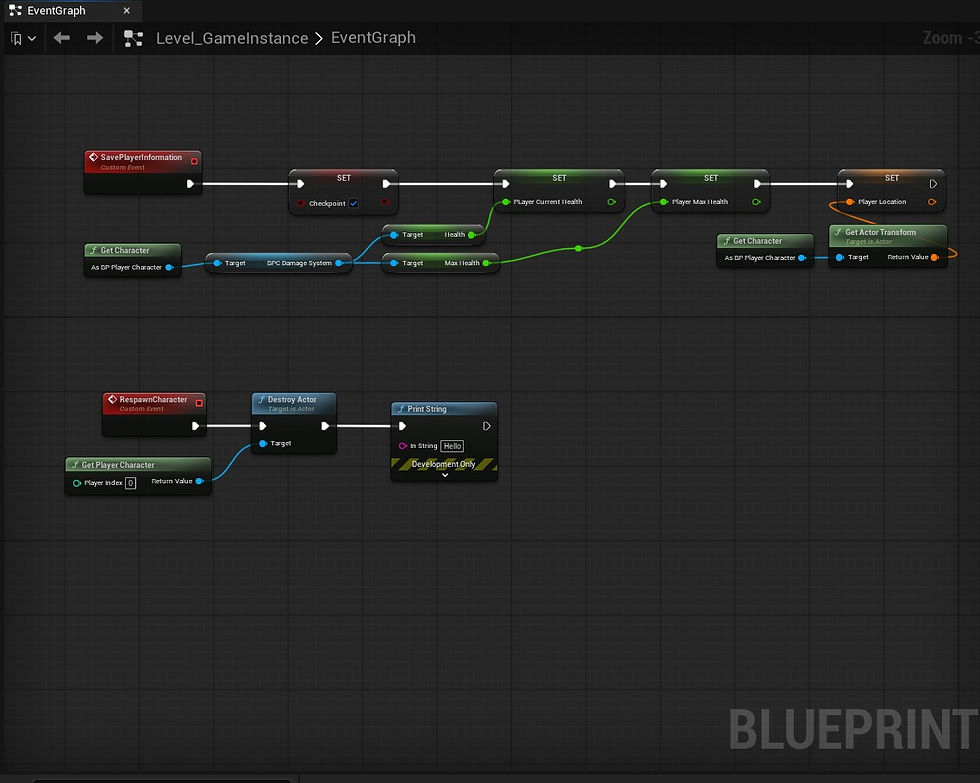

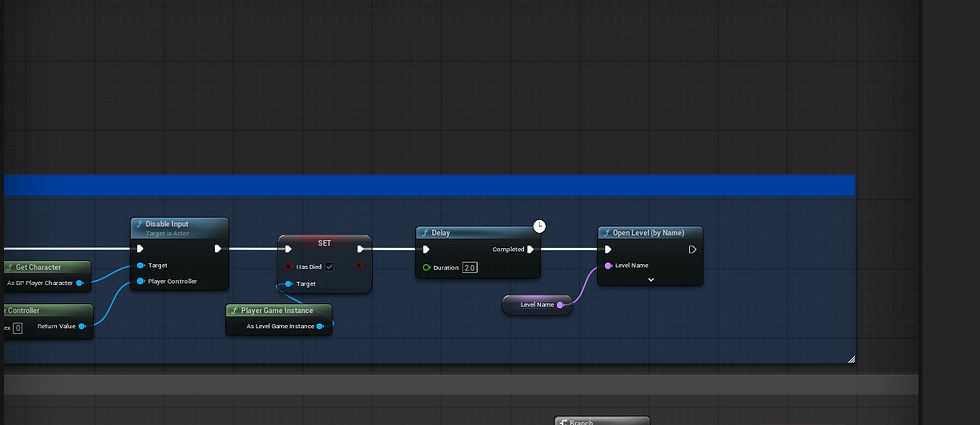
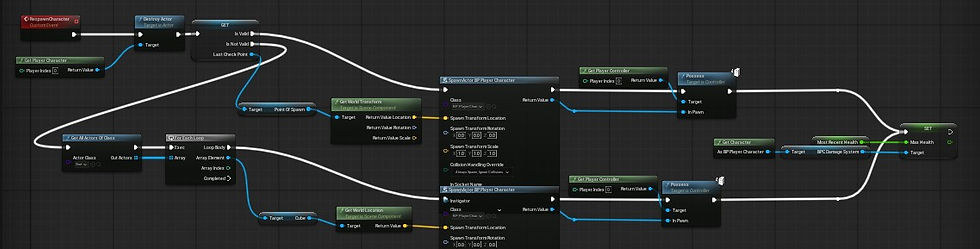
The Save Respawn Point was a bit of a hurdle I had to revisit multiple times during the project. At first, I made it so that when the death trigger occurred through the damage system, it would trigger an event that would spawn a copy of the character at a specific location, then destroy the original actor, and, lastly, possess the newly spawned character at the blueprint. The main issue I discovered later was that, while it respawned the character, it did not reset enemies or other items in the game.
Finding a way to reset the enemies on player respawn was what primarily prompted me to revisit the respawn system. I found the best way to make it happen was by restarting the level. The biggest issue with this was finding a way to avoid everything resetting entirely. I had to use a game instance to track data such as player transform/location, unlocked abilities, player health, and player max health. This is because the details in the game instance are carried over between levels. I also needed to make sure the player would spawn correctly if they didn't have a save point. This was a much easier process as I simply had to use a boolean.
User Interface


Most of the UI creation in this game wasn't complicated. There were other external factors that complicated it.
The main menu was the simplest, as it consisted of adding the required images, layering them correctly, and setting up basic functions and buttons for each clickable option.
The most complicated of the 4 UI widgets I had to create was the main player UI, which I had to bind code to a health bar to simulate real-time damage, max health increases, and healing that occur during gameplay. What also made it complicated was recreating the glow effect, as I had to figure out how to create a user interface material to apply. I discovered that, as most UI is just images and fake assets, you can't apply an emissive color on screen, so instead I had to use masking and power nodes to achieve this effect. It was pretty complicated, but in the end it turned out nice.
The last UI I programmed was a simple pause menu, which I keybinded to the escape button. I found that, since it was an easy make, I added a bit of a joke: a 404 image when the player clicked options. We didn't have anything for the options, so it was a fun extra to include if someone explored the game's UI.


o
Dialogue


Dialogue was one of the simplest functions to program in the project. Given the game's leaning toward a robotic UI theme, I decided to add a bit of style to the text. I decided to go with what most people call typewriter text, where it produces one letter at a time at a specified speed.
The main dialogue process consists of creating data tables that contain all the dialogue, then creating a blueprint widget that grabs the data from each row of the data table, and once complete or a button is pressed, it goes back to reference the table again and grab the next line of text listed in the data table. The harder, newer part of the process was learning to use strings, lenses, and substring nodes to iterate over each letter of the word and generate each letter at a time. While I had to go over it a few times to understand how it worked, it eventually became clear, and I think it would be fun to use again sometime.
Doors/Chaos Physics


For some of the doors in the project, the idea was to create ones that would break on either bullet impact or at a level that would cause it to break. To get this to work, I used the fracture mode that provided a workable break effect once enough force was applied. To cause the lever to break the wall, I had to implement a radial force blueprint that would trigger on level interaction and an event that would enable physics so the mesh could break. A little complicated at first, but it turned out ok. Given more time, I definitely think I could improve it.
Transition Room Teleporter

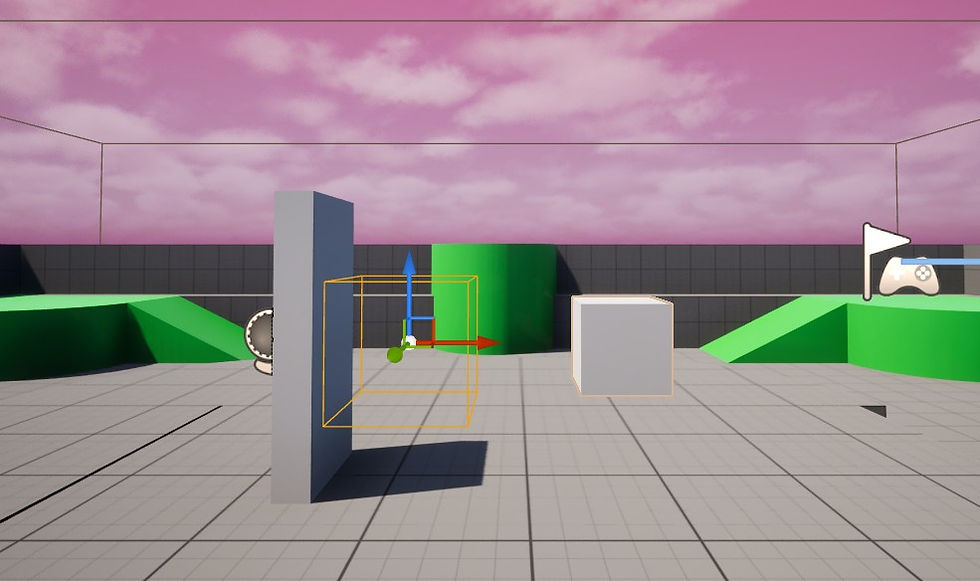


Making this transition blueprint was fairly easy, as it mainly involved using overlap boxes to locate the child box and sending the player to the corresponding location.
To accomplish this, I used 2 collision boxes, each with a child cube. The collision represents where the player would overlap to trigger the event, and the white box of the opposite collision box represents where the player would show up. This meant that once placed in the editor, I could move the white cubes wherever I wanted, and once they overlapped, they would be sent to the cube's location. What I found the most interesting when creating this was using the camera to create a fade-out and fade-in effect. As I have never really used camera nodes or fade-out effects, it was a fun experience, and I'm hoping to use it again in a future project for other transition effects, maybe death scenes, or something similar.
In the end, the transition looked really good. However, while it looked good, its function was not exactly what we were looking for. This is because it doesn't reset anything during the transition. The biggest issue was that I had little time to polish or refine these mechanics, and as I was the sole programmer, I still had a lot of work to do, including animation implementation, a few more UIs, chaos physics, and other tasks.
Animations


In all honesty, I have never been a fan of animation, and I am certainly excited to be doing it. In the end, I didn't really have a choice in the matter about whether we were planning to get this game into the game jam on time. While implementing most animations isn't too much of a pain, model importing is usually a hassle, and the rigging process is just unenjoyable and time-consuming. It's why I usually prefer to have someone else handle the animation rigging for projects.
After importing the model, I have to create the animation blueprint, which consists of multiple states, such as idle, walking/running, and falling. Then some of these transitions consist of certain requirements being met before they happen, such as reading that the character is falling to play the falling animation. The biggest pain for me was having to do all these animations on the last day of the jam due to issues with our 3D animator.
Overall Conclusion
I think this project was very rough around the edges and encountered a fair number of problems, though, looking at my work, I'm pretty happy with what I was able to do in the month I had to work on it. While I wouldn't say the end result was the best, especially in animation and level design, I think I'm happy we were able to put something together. There were many times during the project when I tried to emphasize what I felt was important but was overlooked, so if I were to do this project again, I think I would be more emphatic with the team about what should be done and encourage setting deadlines. Overall, it was still fun, and working with some of my college friends was a fun experience.
Problems | Solution and/or Lesson |
When working on the main player UI, the UI designer was unwavering; despite my countless explanations that certain parts of his design didn't look good or that I suggested changes to the UI layout, he ignored my comments and insisted it had to be his way, refusing to make any changes or compromise. Because of his stubbornness, he caused a significant delay in the project. | After some time had passed, I felt I was making no progress, so I decided to simply take this up with the project lead and go with whatever he thought was best. I felt that some of the pictures and colors I was given blended too much with the background, so I showed variants that looked best. While the UI designer might not have enjoyed it or refused to make any choices, this at least allowed me to make progress and cause no further delays in what I had to get done. |
We started the project with a fairly narrow scope. Though as more people shot forward ideas, more work was building up for both the 3D modeling team and me. Despite saying we needed to keep the scope small, many new additions kept it too long, especially when there is only one person programming the entire project. | Knowing the scope was too large, I informed the lead and a few others, including the 3D team, that I could only complete a set number of tasks within the given time frame and that they should focus on that. My project lead was disappointed, but the game would not have been something playable if they had focused too much on production and not enough on a prototype. When it got to the last week, my project lead didn't want to submit anything as he thought the game wouldn't be displayable. I convinced him that we should have at least something to submit rather than nothing |
As the scope was fairly small at first, I figured it would be fine as the only programmer. As we reached the second week, I needed a second person because the number of things to program was piling up. | Well, the project lead said to tell him if I needed help, so I informed him that he didn't have anybody in mind. When he said, "Tell him if I need help," I was under the impression he knew someone. After finding this out, I tried reaching out to some of my friends in the programming space, but they were too busy. In the end, I just tried to do the best I could within the time frame. |
I made a few requests: simply not to create a Modern Sci-Fi Game and not to have to rig the animations. In the end, neither of these was fulfilled, and even when I brought up certain things I felt were very important, they were just brushed off most of the time. | Personally, this is very rude to do to people, considering that in game dev, finding a place of compromise typically leads to greater success, as it gets everyone fairly invested and shows that people care about others' opinions. What this showed me is that I just have to be more aware of who I join up with, and now I know some people with whom I should not join up or perhaps be more assertive about my points. |

Comments